
Click on the link to jump directly to the help topic. You can click on the "Return to top" link to return to this menu.
The client record screen shots displayed here highlight the required and recommended fields.
Note: the Client ID is generally assigned automatically by PtMS, however, if the user has a unique identifier assigned to each client (for example Medicaid ID) and wants to use this value as the Client ID, the user can enter this directly into the Client ID field. Note: The Client ID is limited to 10 characters.
Fields highlighted in yellow are required fields. Fields highlighted in green are recommended fields.

 Return to top
Client Records use a tabbed form for accessing the sections of the client record. Click on the tab at the top of the form to select the specific data section for display or editing.
Click on the "Edit Client" button to place the record in edit mode to make changes to the record. Click on "Save Client" button to save any changes to the client record.
The "Client CMN"(Client Medical Necessity Certification) button and the "Schedule Trip" button on the tool bar at the bottom of the Client Records form open new windows for entering CMN or Service Request information.
The "Options" tab at the top of the Client Record provides access to scheduling and other data entry and monitoring functions. "View Providers" lists the available providers in PtMS.
Return to topTo create a new client record follow these steps:
Clear the screen of exising client information by clicking on the "Clear Scrn" button on the bottom toolbar
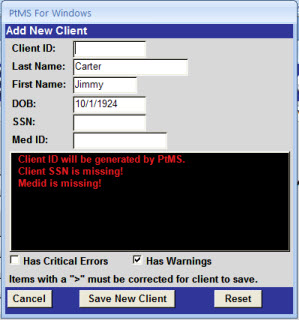
Click on the "Add Client" button on the bottom toolbar - this will display a popup window.
Enter Last Name and First Name, Date of Birth is recommended, other fields are optional. Click on "Verify Client" to confirm the client is not entered already in PtMS or another client does not have the same SSN or Medicaid ID.
Click "Save New Client" to create the client record and display the record in the "Client Info" window.
 Return to top
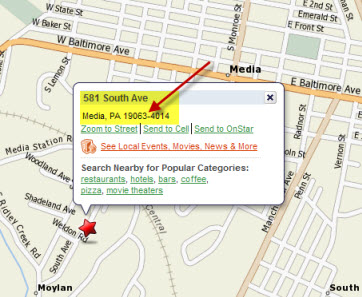
Enter the client's address information on the "Client Info" window. Make sure to include zipcode. If you are not sure of the zipcode for an address enter the address information then click on the "Map Quest" button. This will display the address on a Map Quest map in a separate window. The address information along with the zipcode will be displayed.
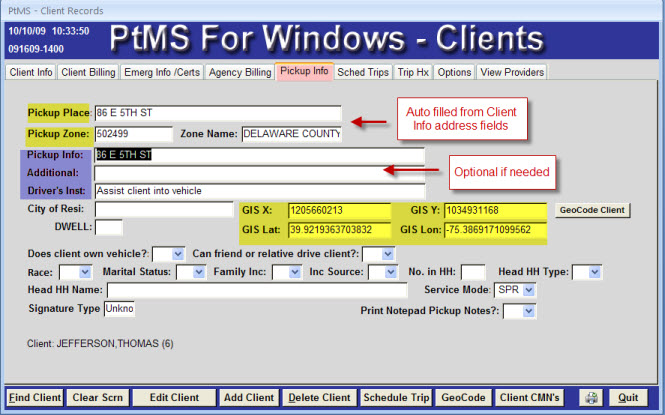
Next click on the "Pickup Info" tab then click on the "Geocode Client" button. This will display the geocoding window.
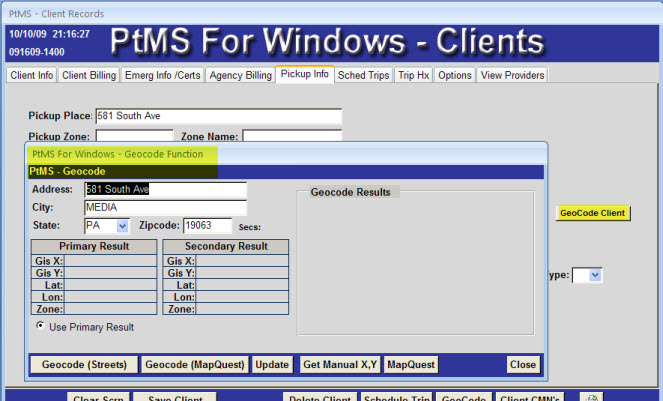
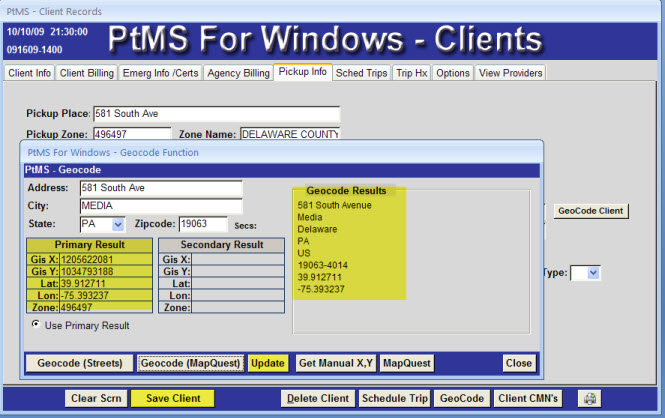
Click on "Geocode (Streets)" or "Geocode (MapQuest)", both will return the address Latitude/Longitude and X,Y map coordinates. However, the Streets option will only work for addresses for the displayed maps. The MapQuest option will work for any address in the US. Note: users can edit any address information in the geocoding window and this will not change the address information in the client record. Sometimes apartment numbers or other extra informaiton needs to be removed from the address line to get an accurate geocoding result.
Once the geocoding results are displayed click on "Update" to close the geocodiing Window and update the clien record "Latitude/Longitude and X,Y" fields. Click on "Save Client" to save the geocoding results and any other edits made to the client record.
 Return to top
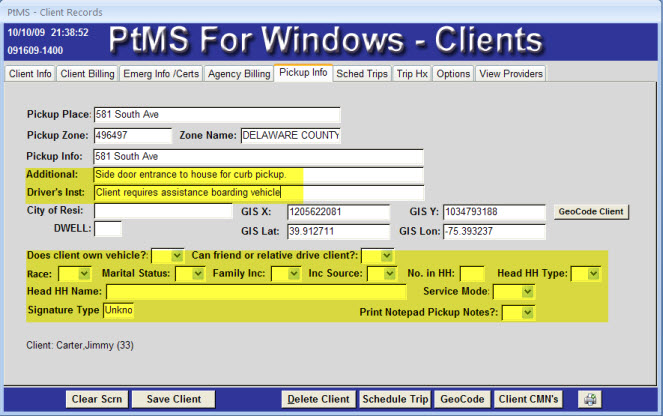
The Pickup Information window allows users to enter additional pickup information for the driver as well as client demographic information.
 Return to top
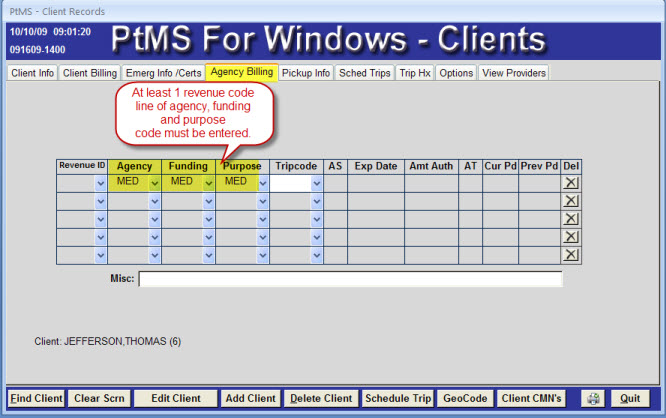
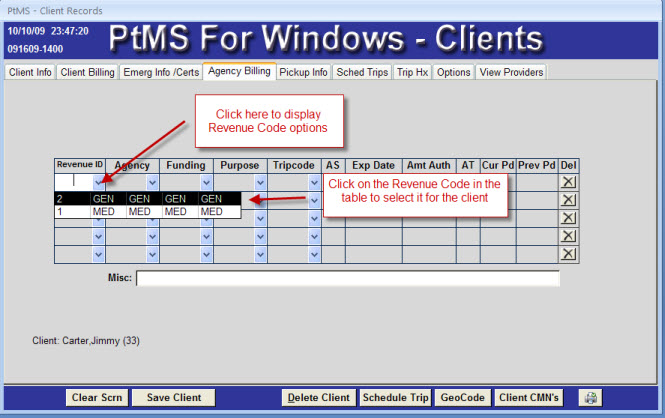
The Agency Billing window is where the revenue codes assigned to a specific client record are stored. Revenue codes refer to the combination of Agency, Funding, Purpose and Tripcodes that detail what agency or program is sponsoring or paying for a scheduled trip, for what purpose, at what trip rate (cost) including client boarding fares or co-payments.
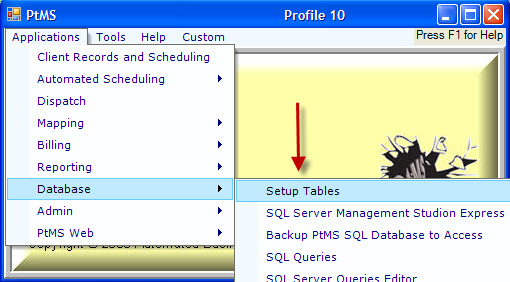
Agency, Funding, Purpose, and Tripcodes are entered using the PtMS setup module. Setup can be accessed from the PtMS Menu by selecting Applications/Database/Setup.
Once Agency, Funding, Purpose and Tripcodes have been entered into their respoective tables, they must be combined into revenue codes and entered int the the Valid Service Authorizations table.
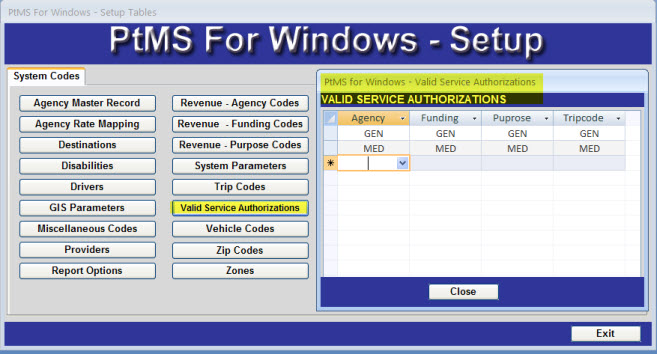
When users enter Revenue Codes in the client record, they are selecting from the list of Valid Service Authorizations entered into PtMS. To enter a new revenue code in a client record, click on the "Agency Billing" tab then click on the "Revenue ID" drop box arrow to select a revenue code for the client record.
 Return to top
The Scheduled Trips window displays current standing order or "routine" trips scheduled for a client and all future demand trips scheduled for a client.
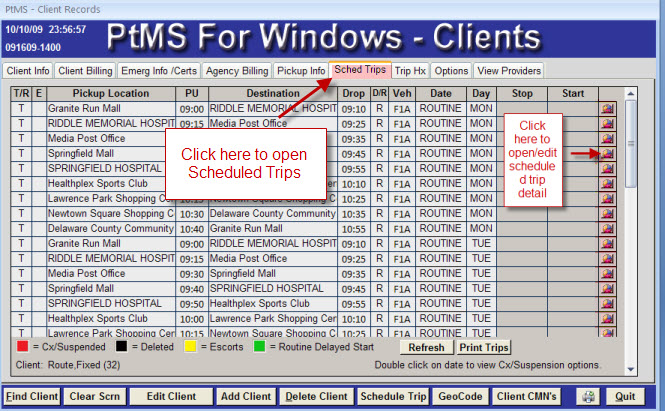
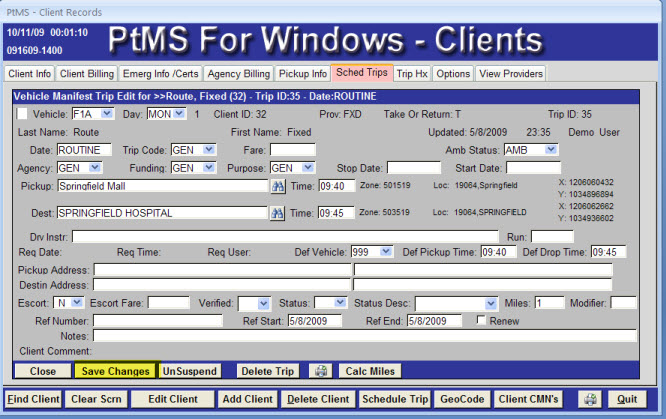
Users can open any scheduled trip by clicking on the "trip detail" icon. Edits made on the trip detail window must be saved by pressing the "Save Changes" button.
 Return to top
The Trip History window displays a complete listing of all trip transaction records for a client stored in the trip transactions table.
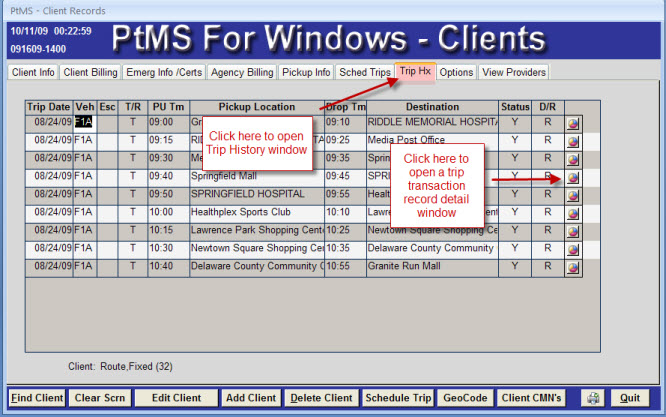
Users can open any trip transaction record for a client by clicking on the "trip transaction detail" icon. All edits made on trip transaction records are saved automatically when the user closes the trip transaction detail window.
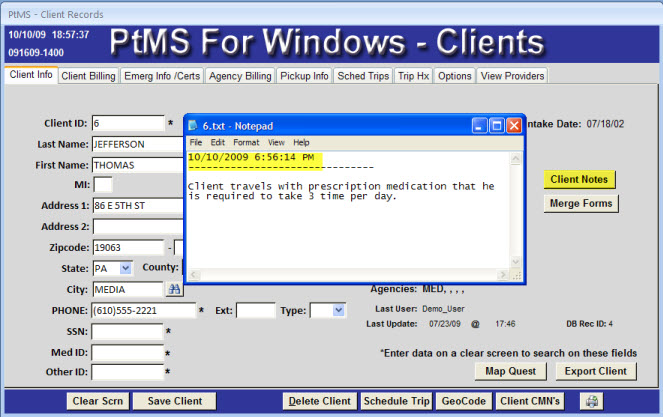
Clients notes opens a text document for each client in the PtMS Client Notes folder. The text document is automatically named "ClientID.TXT" where "ClientID" is the clientid field value in the client's record, and opens automatically when the users clicks on the "Client Notes" button.
A time and date entry is made each time the client notes field is entered. Users should enter their new notes below the new time and date entry. You must click on File/Save to save the new notes that are keyed or pasted into the client's note file. Finally, the notefile must be close be click on the "X" in the top right corner or click File/Exit.
 Return to top
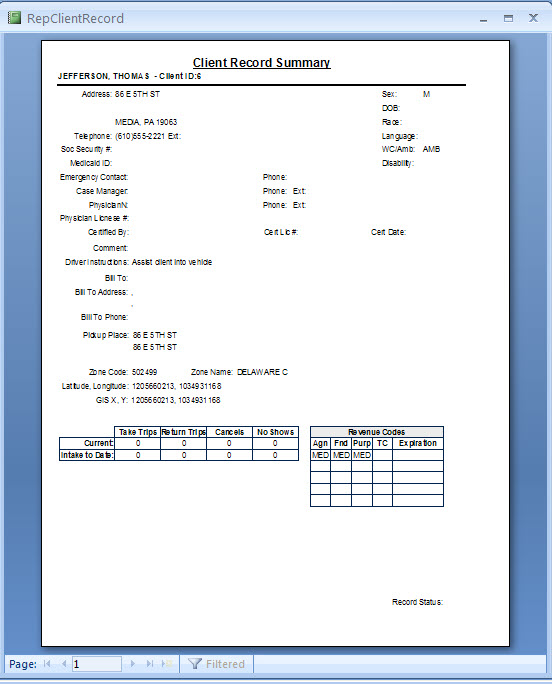
To print a summary of the client record click on the print icon on the bottom tool bar on the client record.
This will display a print preview summary of the client record. Click on the printer button, select your printer options and click OK to send the report to the printer.
 Return to top
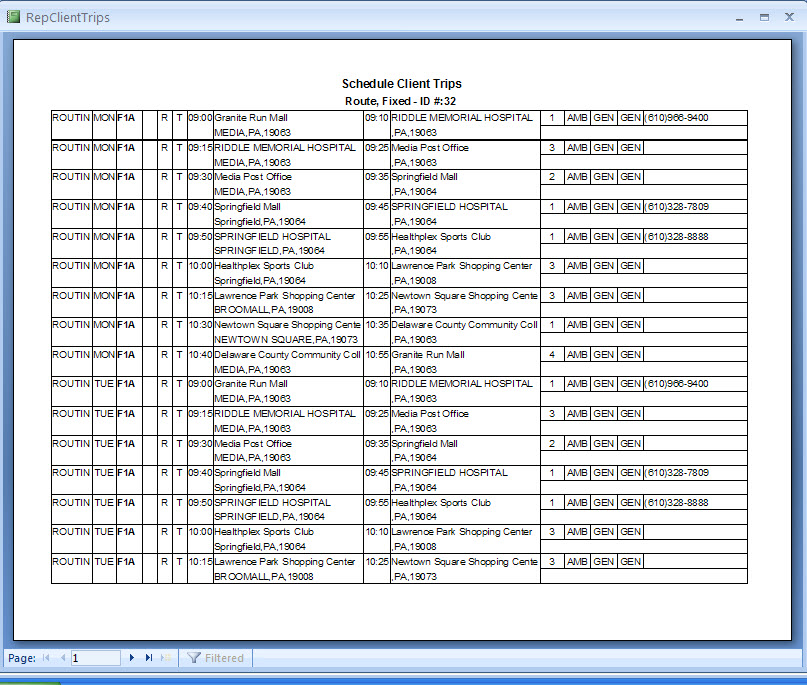
To print a summary of all scheduled trips for a client, select the "Scheduled Trips" tab, the click the "Print Trips" button.
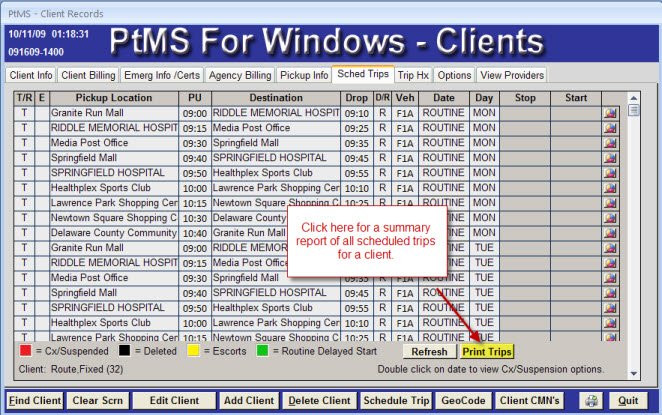
This will display a print preview summary of the scheduled trips for the selected client record. Click on the printer button, select your printer options and click OK to send the report to the printer.
 Return to top
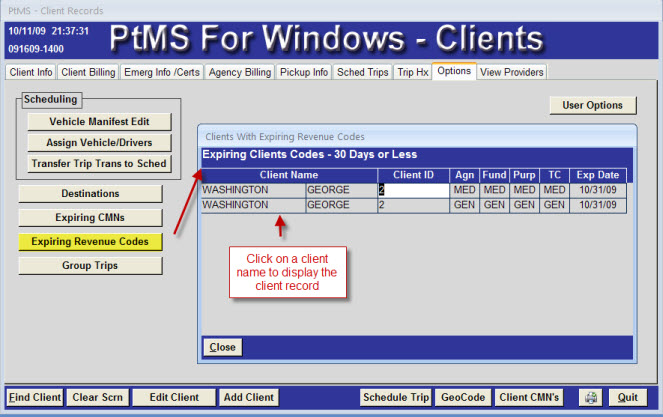
Revenue Codes entered on the client record "Agency Billing" window have an option "Expired Date" field where the user can enter an expiration date for the Revenue Code. The "Expiring Revenue Codes" browse lists all clients with revenue codes due to expire within 30 days of today's date or revenue codes that have already expired. Clients are listed alphabetically with each line in the table representing a separate revenue code due to expire for a client. Click on any client name and the client record will be loaded and the user placed directly on the "Agency Billing" client record window.
 Return to top